|
The Main Screen in Detail |

|

|

|
||
|
The Main Screen in Detail |
|
|

|

|
The Main Screen in Detail
|
The Main Screen in Detail |
|
|
|
||
|
The Main Screen in Detail |
|
|
|
|
After logging in the user is taken to the home screen, shown below. This main screen displays all the surveys that the user or users group has setup, as well as all the other features designed to make creating and sending survey invitations powerfully easy.
From this screen the user;
| • | creates new surveys, |
| • | edits existing surveys, |
| • | launches surveys |
| • | sends out invitations, |
| • | monitors the responses, and finally, |
| • | extracts the data. |
This section of the manual explains this main screen and the destinations you can navigate to from it. Detailed explanation on each section is provided latter in the manual.
THE MAIN SCREEN.
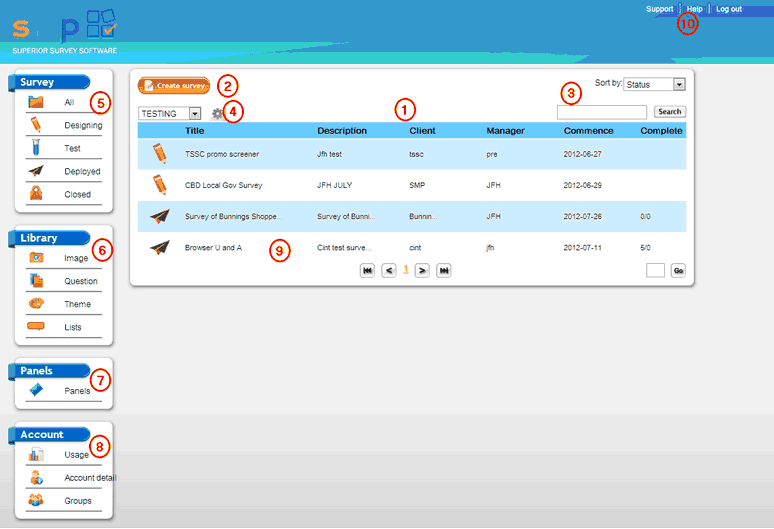
The regions of the Home Screen are described below.
1. The center pane is where your surveys are listed and where the main controls for organising and finding your surveys are kept.
2. The Create Survey button is where a new survey begins. Pressing this button displays the Survey Detail popup that allows you to setup the main features of your survey. Once created your survey will be listed in the center pane and automatically be set in design status mode.
3. The controls here allow you to sort the surveys in your list by, Status (which is the default), Commence, which will sort surveys by there commencement date, and, finally alphabetically by Title.
Alternatively you can use the search box to type in some text that you wish to look for that will identify the survey you are looking for and then press the "Search" button.
4. The controls here allow you to create new folders to store your survey in, and to select the folder in which your survey resides. By selecting a folder all the surveys in that folder will be revealed and all others hidden.
Surveys are assigned to folders in the "Survey Detail" section of each survey either when they are created or pressing the "survey detail" button located at the top of the survey editor screen.
Note: A folder must have been first created here before a survey can be allocated to it. Folders cannot be created anywhere else in the program.
5. The stages your survey must pass through in order to be launched are summarised here. As you change the status of a survey it gets a different icon and different menu options appear. Filtering your surveys by the status they are currently in is done here and helps you navigate the system. Clicking on one of the options causes the system to display only the surveys in that mode. For example, if you wish to see only the surveys that you are currently "Designing" then click on the "Designing" icon. Only surveys of this status will be displayed. A list of surveys of any of the four statuses - designing, testing, deployed and closed can be displayed in this manner.
6. The Libraries menu enables you to edit any of the various library tools that you can employ to help build and manage your surveys.
The image library is used to store any multi media including videos, audio files and images that you use in your survey.
The Question library is used to store banks of questions that you use often and can be pasted straight into your surveys from the question editor.
The Themes library is where you can create of edit the various themes that you wish to use to control the look and feel of your surveys.
The Lists library is used to store large lists and values that you may use in many surveys such as suburbs, post codes or brand lists and can also be used to create tables of lists that can be used in the survey to display filtered lists depending on answers given by respondents to earlier questions such as; displaying only Sydney suburbs if the respondent chose Sydney from an earlier question related to where they liive.
7 The Panels section is where you can import lists of people and emails that you wish to send survey invitations to. Your panels can be imported from excel, filtered and edited, and once created used to send survey invitations to.
8. The Account menu is where you can change your password, set up new users in your account an check your usage over a certain filtered period of time.
9. The main screen lists all the surveys in your system, sorts them by the status that they are in, and when the mouse is hovered over a particular survey highlights a list of user options available for that survey dependent on the status that you are in.
Note: There is a dropdown list of extra options at the end of each survey line that is visible when that line is hovered on and the dropdown is clicked on.