|
Single Select. |

|

|

|
||
|
Single Select. |

|

|

|

|
Single Select.
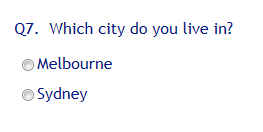
Example of a single select text question:
Question Elements:
![]() : Enter the question text by clicking on the Question Text icon. A rich text editor box appears where you type your question. You have full rich text control over the question formatting.
: Enter the question text by clicking on the Question Text icon. A rich text editor box appears where you type your question. You have full rich text control over the question formatting.
Note the question text appears in the central panel (Question Display) when you close the rich editor box by clicking the
![]() in the top left corner.
in the top left corner.
![]() : Enter the instruction text by clicking on the Instruction icon.A rich text editor box appears where you type your instructions. You have full rich text control over the question formatting.
: Enter the instruction text by clicking on the Instruction icon.A rich text editor box appears where you type your instructions. You have full rich text control over the question formatting.
Note the Instruction text appears in the central panel (Question Display) when you close the rich editor box by clicking the
![]() in the top left corner.
in the top left corner.
![]() : If this option is checked a page break will be inserted after this question forcing the next question to appear on a separate screen. If you desire a number of questions to appear on the same page then uncheck this option and the next question will appear under this one and so on until you check the box to force a new page.
: If this option is checked a page break will be inserted after this question forcing the next question to appear on a separate screen. If you desire a number of questions to appear on the same page then uncheck this option and the next question will appear under this one and so on until you check the box to force a new page.
![]() : If checked the question must be answered by the respondent. Note that the default setting is ‘True’ or on.
: If checked the question must be answered by the respondent. Note that the default setting is ‘True’ or on.
Answer Wide Parameters
![]() Add Answer Text: Click to add another answer option. Note your answers appear in the central panel (Question Display) as you enter them. Answer order can be changed with the up and down arrows, or deleted with the cross which all sit beside each answer.
Add Answer Text: Click to add another answer option. Note your answers appear in the central panel (Question Display) as you enter them. Answer order can be changed with the up and down arrows, or deleted with the cross which all sit beside each answer.
![]() Add Image Answers: Click on this icon to open the image library and choose the images you wish to include as possible answers.
Add Image Answers: Click on this icon to open the image library and choose the images you wish to include as possible answers.
![]() Add Rich Text Answer: Click on this icon to include a rich text answer. Click on the rich text editor icon to open the rich text editor and include any formatted type of question you like.
Add Rich Text Answer: Click on this icon to include a rich text answer. Click on the rich text editor icon to open the rich text editor and include any formatted type of question you like.
![]() Add Answer Frame: Opens a popup that enables the user to add all the answers to a question in one go. Each separate answer must be on a separate line. You can CUT and PASTE the answers into this box from another source such as MS Word.
Add Answer Frame: Opens a popup that enables the user to add all the answers to a question in one go. Each separate answer must be on a separate line. You can CUT and PASTE the answers into this box from another source such as MS Word.
![]() Add Answer Heading: Allows the user to enter a heading in a list of answers that separates the answers into the users desired logical segments. Note: These cannot be randomized nor piped to other questions.
Add Answer Heading: Allows the user to enter a heading in a list of answers that separates the answers into the users desired logical segments. Note: These cannot be randomized nor piped to other questions.
![]() Answer Names: Allows the user to name each answer variable which will be used in the data extract.
Answer Names: Allows the user to name each answer variable which will be used in the data extract.
![]() Text Input: Provide text box for user input when this option is selected by the respondent - (e.g. for “Other (Please write in)”)
Text Input: Provide text box for user input when this option is selected by the respondent - (e.g. for “Other (Please write in)”)
![]() Skip instruction: Set to select another question to route respondent to if this answer is selected. By selecting this option a drop down containing a list of the available questions to skip to will appear. Select the destination question if this answer is selected. Note that it is also possible to select ‘Screen out’ which will cause the survey to be exited.
Skip instruction: Set to select another question to route respondent to if this answer is selected. By selecting this option a drop down containing a list of the available questions to skip to will appear. Select the destination question if this answer is selected. Note that it is also possible to select ‘Screen out’ which will cause the survey to be exited.
![]() Fix Position: Lock an answer in position so that it maintains the same positional order despite answer randomization. Clicking on this option causes a selector box to appear beside each answer. Check the boxes next to each answer that you do not wish to rotate.
Fix Position: Lock an answer in position so that it maintains the same positional order despite answer randomization. Clicking on this option causes a selector box to appear beside each answer. Check the boxes next to each answer that you do not wish to rotate.
![]() Embed Replace: Supply an alternative text option that will be used to embed this answer in a following question or answer text if you wish to use something other than the value selected. Selecting this option causes a text box to appear next to each answer were the alternative embed text can be inserted.
Embed Replace: Supply an alternative text option that will be used to embed this answer in a following question or answer text if you wish to use something other than the value selected. Selecting this option causes a text box to appear next to each answer were the alternative embed text can be inserted.
![]() Answer Value Column: Set the values you want to appear in the data extract for each possible answer in your question.
Answer Value Column: Set the values you want to appear in the data extract for each possible answer in your question.
![]() Import Answer: Use this option to import a list of answers that you have previously uploaded to the "List Library" and maintained. This feature is ideal for maintaining large brand lists or lists of suburbs, postcodes sorted by state etc, that you may tend to use in your work over many surveys.
Import Answer: Use this option to import a list of answers that you have previously uploaded to the "List Library" and maintained. This feature is ideal for maintaining large brand lists or lists of suburbs, postcodes sorted by state etc, that you may tend to use in your work over many surveys.
To use the list must have first been uploaded - see Using and Maintaining Long Answer Lists
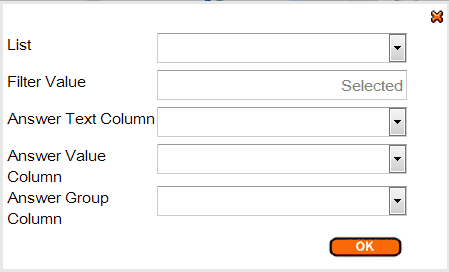
To upload an answer list select the list from the List dropdown.
Then choose a Filter Value is using. For example if you had a list which had two columns - City and Suburb, and you wanted to load the suburbs for Sydney only then you would select Sydney from the Filter Value dropdown.
The "Answer Text Coilumn" is the column to be used that contains the answer list you wish to import.
The "Answer Value Column" is optional and is used if you wish to use a different answer value to the default which is the order of the list.
![]() Answer Group Column: Pressing on this icon will reveal a drop down next to each answer. To assign answers to a created "Answer Group" select the appropriate group in each drop down next to the appropriate answer. To see how to create an "Answer Group" see below under Create Answer Group.
Answer Group Column: Pressing on this icon will reveal a drop down next to each answer. To assign answers to a created "Answer Group" select the appropriate group in each drop down next to the appropriate answer. To see how to create an "Answer Group" see below under Create Answer Group.
Question Wide Parameters
The following parameters are available by clicking on the arrow next to "Answers" to reveal the following drop down.
![]()
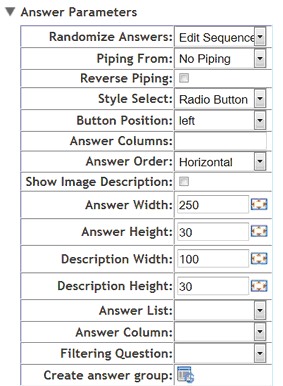
Randomize answers: There are four randomize answer options for the user to select from -
Edit Sequence: This option does not randomize but presents the answers in the order they are set to when entered.
Normal Random: Check the box to randomize the order of the answers for each respondent. Note that this option is often used with the Fix Position option to exclude options like Other and None from being included in the randomization.
Random Reverse: This option reverses the order in which the answers are presented from "first to last" to - "last to first" at random for different respondents.
For example one respondent will be shown the answers to a scale in this order -
Agree - Somewhat agree - Neither agree nor disagree - Somewhat disagree - Disagree : and another respondent will be shown the same scale but in the reverse order:
Disagree - Somewhat disagree - Neither agree nor disagree - Somewhat agree - Agree
Random Rotate: The order of the answers will rotate in order for each respondent such that the first answer will move to the end for the next respondent and then that new first answer will be moved to the end of the list for the next respondent and so on. In this way the order is preserved but presented in a different way.
Piping from: Used to populate the answer fields with the answers selected by a respondent at an earlier question.
Reverse piping: populates the answer fields with all the answers from a previous question that were NOT selected.
To use simply select from the drop-down the previous question that contains the answers you wish piped.
NOTE: To construct a more sophisticated piping regime based on several previous questions use a Pipe question type.
Style select: Selects the style that you wish the answers to be presented in. These styles include:
Radio Button - the default style whic is an empty circle the respondent clicks on.
Drop Down List: Converts the question to a drop down type question placing the answers in a drop down box like in the example below.
![]()
Button: Presents each answer as a button the respondent can click on to select.
Button Position:
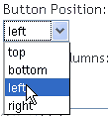
The button can be located to one of four positions relative to the answer. The new locations appear instantly in the central Answer Display panel.
Answer Columns: Arranges the answers into the designated number of columns. Useful for long lists of potential answers.
Answer Order: Arranges the list of answers in either a horizontal fashion - across the top first then down to the next row, or, vertical, down the column first then across to a new row.
Show Image Description: Will cause the description of an image to be displayed when image answer types are used. Note that the image description needs to have been created for the image in the image library first before loading the image. If you create the image label after the image has already been loaded as an answer you need to re-get the image. This protects the integrity of the image answer and means that with care the same image can be used in several questions with different labels.
Resizing Images:
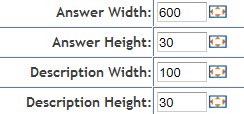
These options all allow the user to define the height and width of the answer values whether they are images or text. This can be achieved by either typing the exact number of pixels desired for the width and height or by clicking on the box image which causes the following pop up to appear. Once this pop up appears the size of the answer and/or description of an image can be set by dragging the pop up boxes to the desired widths.
Hover over the bottom right hand edge of each box and drag to the desired size.

Answer List: Select the list you want to use as the answers for this question from the drop down. Note that the list must have all-ready been created in the "Lists" library.
Answer Column: Select a column from the "List" selected above to use as the answers. Duplicate members of a selected column will only appear once.
Filtering Question: It is possible to filter the list of answers that appears in the answer frame based on the answer given to a previous question.
An example of using this feature would be to present the relevant list of suburbs as answers based on a previous answer being the city they live in. So if they selected Sydney only the Sydney suburbs would be presented, etc.
To learn more about using the List Library go here - Using and Maintaining Long Answer Lists
Create Answer Group: Clicking on the create answer group icon ![]() reveals the following pop up
reveals the following pop up
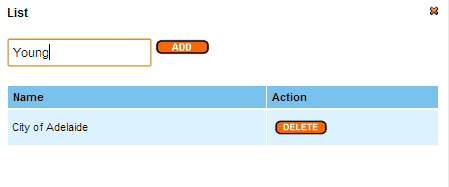
In the above example the scripter is about to add the answer group "Young". Clicking on the "Add" button and closing the pop up will complete this task.
Clicking on the "Answer Group Column" icon ![]() will reveal a drop down next to each answer. To assign answers to a created "Answer Group" select the appropriate group in each drop down next to the appropriate answer.
will reveal a drop down next to each answer. To assign answers to a created "Answer Group" select the appropriate group in each drop down next to the appropriate answer.
A scripter may wish to define an answer group for use latter in the survey logic of all those respondents considered to be young for the purposes of this survey. So the scripter would select the group "Young" in the drop down as in the age question example below.
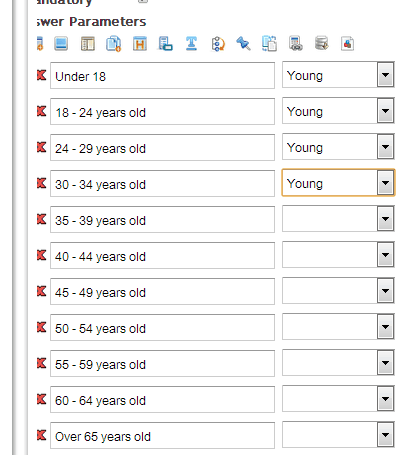
This defined group can then be used latter with survey controls such as "Compute", "Pipe", and "Gate" to create new questions, quotas, pipe answer frames or route respondents.
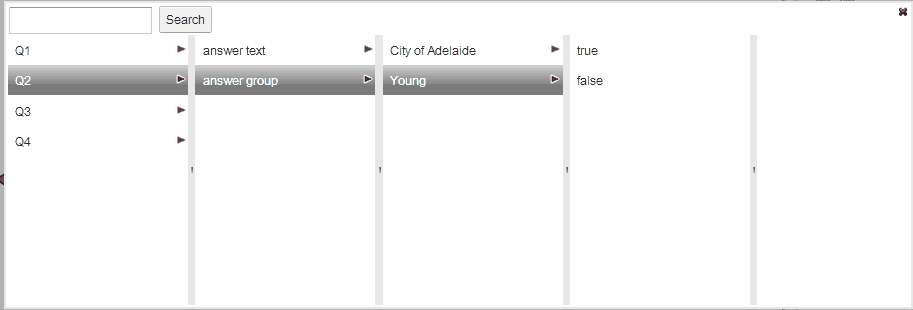
The answer group will appear in the "Condition Builder" as in the example below.
